

So, one of your wheel studs decided to call it quits, huh? Don't sweat it. Replacing a busted wheel stud can seem like a big job, especially when you're staring at a pile of parts and wondering where to even begin. But honestly, it's totally doable without needing a mechanic's salary or a full set of specialized tools. We're going to break down how to get that stubborn stud out and a new one in, making sure you don't end up hating your car, your tools, or yourself in the process. Let's get these wheel studs sorted.
Key Takeaways
- You can often replace wheel studs without taking off the axle nut, saving a lot of hassle.
- You might need to bend the rotor dust shield slightly to get enough room to work.
- Grinding one side of the new wheel stud can help it fit past obstacles.
- A hammer and a few well-placed taps can get the old stud out and the new one in.
- Using washers and a lug nut is a common trick to pull the new wheel stud into place.
The Great Wheel Stud Escape Plan
So, you've discovered a wheel stud has decided to pack its bags and leave your hub without so much as a goodbye note. Maybe it snapped off during a particularly enthusiastic lug nut tightening session, or perhaps it just got tired of the daily grind. Whatever the reason, a missing or damaged wheel stud is more than just an aesthetic issue; it's a safety concern that needs addressing. Before you start weeping into your toolbox, let's hatch a plan to get that stubborn little metal rod out of its predicament and welcome a new one into the fold. This isn't going to be a walk in the park, but with the right approach, you can avoid a full-blown mechanical meltdown.
When Your Wheel Studs Decide To Call It Quits
Sometimes, studs just give up. They might be old, corroded, or have simply endured too much stress. You might notice a wobble, hear a clunking noise, or see that one of your lug nuts just isn't sitting right. Don't ignore these signs! A compromised stud can lead to a wheel coming loose, and that's a party nobody wants to attend. It's usually pretty obvious when a stud has had enough – it might be broken off flush with the hub, or maybe it's just spinning freely, refusing to hold a lug nut.
Gathering Your Arsenal Of Tools (And Maybe Some Band-Aids)
Before you dive headfirst into this, let's make sure you have what you need. You don't want to be halfway through the job and realize you're missing a critical piece of equipment. Think of this as your pre-mission briefing.
Here's a basic rundown of what you'll likely need:
- A good set of sockets and a ratchet (metric, usually 19mm for the caliper bolts, but check your specific vehicle).
- A breaker bar or a pipe to extend your ratchet's reach – some of those bolts are on there for dear life.
- A hammer – yes, a good old-fashioned hammer. Sometimes brute force is the only language they understand.
- A flathead screwdriver – useful for prying things apart.
- A grinder (angle grinder or Dremel) – this might be your best friend or your worst enemy, depending on your comfort level.
- A new wheel stud (make sure it's the correct one for your vehicle!).
- A few large washers and a lug nut for the installation process.
- Penetrating oil (like WD-40) – let it soak in to help loosen things up.
- Safety glasses – seriously, don't skip these. Metal shards have a way of finding eyes.
- Gloves – to keep your hands from getting too grimy (or cut).
The 'No Axle Nut' Gambit: A True Test Of Patience
Normally, changing a wheel stud on the front of many vehicles requires removing the axle nut. This can be a real pain, often needing a special socket and a serious amount of torque to break free. But fear not, brave mechanic! There's a way to try and bypass this step. It involves a bit of clever maneuvering and, let's be honest, a healthy dose of luck. The goal here is to work around the axle nut, which means we'll be getting intimately familiar with the brake components and the hub assembly. It's a bit like trying to sneak past a sleeping dragon – you have to be quiet, precise, and ready to run if things go south.
This whole process hinges on being able to get the rotor off without disturbing the hub assembly too much. If you can manage that, you might just save yourself a whole lot of headache and a trip to the parts store for that elusive axle nut socket.
Operation: Free The Stubborn Stud
Alright, so you've identified the enemy: a wheel stud that's decided to retire early, or worse, snapped off mid-adventure. Now it's time to get serious. This isn't just about swapping out a part; it's a battle of wills between you and some very stubborn metal. First things first, we need to get the caliper and rotor out of the way. Think of them as the bouncers at the club, blocking your path to the main event.
Wrestling The Caliper Off The Hook
This part can be a bit of a wrestling match. You'll need to unbolt the caliper and then carefully maneuver it off the rotor. Sometimes, you can just hang it out of the way with a bungee cord or a piece of wire. Don't let it just dangle by the brake line, though; that's a recipe for disaster and a costly repair. You might need to gently pry the brake pads apart a smidge to get it to slide off. It's like trying to get a stubborn toddler into their car seat – requires a bit of finesse and maybe a little bit of grunting.
Convincing The Rotor To Let Go
Once the caliper is out of the picture, the rotor is next. If your car is like most, there might be a couple of small screws holding it in place. These can be a real pain, especially if they've been there since the dawn of time. A good whack with a hammer or an impact driver (if you're lucky enough to have one) usually does the trick. If not, well, more persuasion might be needed. Just remember, we're trying to convince it, not break it.
The Notched Cover: Your New Best Friend (Or Foe)
Now, here's where things get interesting. You'll notice a metal cover behind the rotor. This thing is often notched where the caliper used to sit. This notch is your golden ticket! You don't necessarily have to remove the whole cover. By spinning the hub, you can line up the offending stud right with that opening. This gives you just enough wiggle room to work with. Sometimes, you might need to bend this cover out of the way a bit. Don't worry, you can usually bend it back later. It's like giving a little space for a shy guest to join the party.
Grinding Your Way To Victory
The Stud's Makeover: A Grinder's Tale
Alright, so you've wrestled the caliper off, convinced the rotor to let go, and now you're staring at that stubborn stud like it personally offended your ancestors. It's time for some aggressive negotiation. This is where the angle grinder comes in, your new best friend (or at least, your temporary, noisy acquaintance). We're not trying to turn this stud into a toothpick, just give it a little nip and tuck so it can slide past the spindle without a fight.
Why We're Messing With The Stud's Anatomy
Think of the spindle as a grumpy bouncer at a club. It's got a tight grip and doesn't like anything that doesn't fit perfectly. The new stud, fresh from the factory, is a bit too round and plump to squeeze past the spindle's awkward angle when you're trying to get it into the hub. We need to shave down just one side of the stud's back lip, making it flatter. This gives you just enough wiggle room to get it started.
- Target Area: Grind down the back lip of the stud.
- Goal: Create a flatter surface on one side.
- Caution: Don't go crazy! We only need a little bit of clearance.
Straightening Things Out: Bending The Rules (And The Cover)
Before you start grinding, you might need to do a little bending yourself. That little metal cover behind the rotor? It's probably in the way. Gently bend it back just enough to give yourself some breathing room. You can usually straighten it back out later, so don't stress too much about it. Once you've got clearance and your stud has had its makeover, you can try to persuade the new stud into place. Sometimes, a few gentle taps with a hammer are all it takes to get it started. Then, you can use a lug nut and some washers to pull it the rest of the way in. It might feel a little dicey, but trust the process (and maybe wear some safety glasses).
Remember, the goal here is to make the stud fit without damaging the threads on the hub. A little grinding and some careful persuasion go a long way. If you're feeling nervous, take a deep breath. You've got this.
The Delicate Art Of Stud Installation
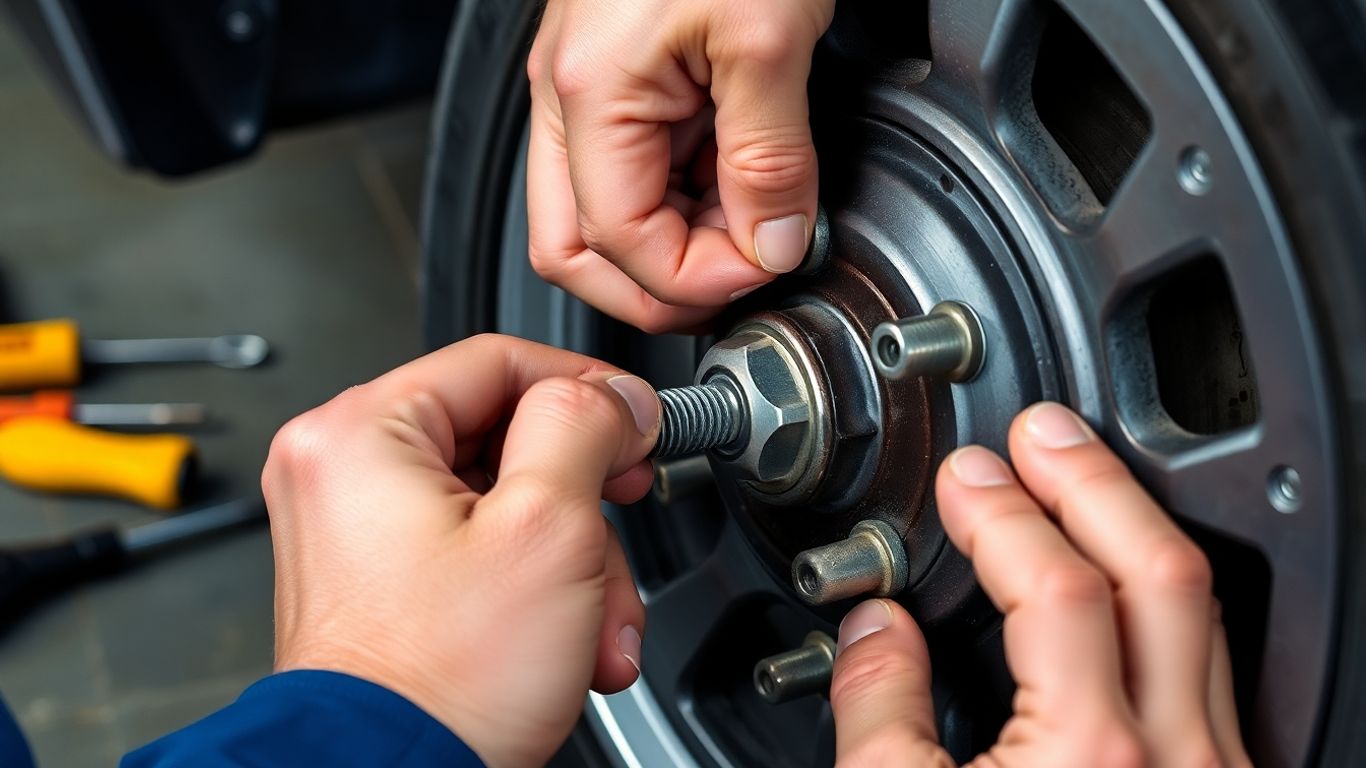
Alright, you've wrestled the old, busted stud out of its misery. Now comes the fun part: getting a shiny new one to take its place. This isn't exactly brain surgery, but it does require a bit of finesse, or at least a willingness to get a little greasy.
Hammer Time: Gentle Persuasion For The New Wheel Stud
So, you've got your new stud. It's probably looking all innocent and straight, which is nice. Before you go whacking it in, remember that little trick we talked about earlier? If you had to grind down one side of the stud's back lip to get it past that pesky spindle or cover, now's the time to use that ground-down bit to your advantage. Rest that flat side against whatever's in the way and give it a gentle tap with the hammer. We're not trying to win a demolition derby here; just nudge it into position so it's not fighting the threads or the hub.
The 'Push And Bang' Method: A Stud's Rite Of Passage
Once the stud is mostly in place, and you've cleared the initial obstacles, it's time for the main event. You'll want to use a hammer to drive the stud the rest of the way in. The goal is to get the stud seated flush against the hub. You might need a few solid, deliberate whacks. Don't go crazy, but don't be shy either. Think of it as a firm handshake, not a full-on brawl. If you're worried about damaging the threads, you can always put a lug nut on backwards (just a few turns) to protect them while you hammer. It might feel a little rough, but most studs can handle a bit of persuasion.
Admiring Your Handiwork: The Pain-Free Stud
After a few well-placed hammer blows, your new stud should be sitting proudly, flush with the hub. Give it a wiggle – it shouldn't budge. If it feels solid, congratulations! You've successfully installed a wheel stud without completely losing your cool. Now, just reverse the process: put the rotor back on, wrestle the caliper back into place, and tighten those lug nuts. You've earned a moment of quiet satisfaction. Maybe even a snack.
Addressing Your Inner Doubts (And Others')
Alright, let's talk about the elephant in the garage. You've wrestled with the caliper, convinced the rotor to let go, and maybe even performed some questionable surgery on that stubborn stud. Now, your brain is probably screaming a few things, and your buddy Jake (who conveniently disappeared when things got greasy) is definitely going to have opinions. Let's tackle those nagging worries head-on.
Will Grinding Weaken My Precious Wheel Stud?
This is the big one, isn't it? You've seen that little bit of grinding on the stud's shoulder. Does that mean it's going to snap off the next time you hit a pothole the size of a small crater? Honestly, the amount you grind is usually minimal. We're talking about just enough to clear the spindle or that slightly bent dust shield. Think of it like giving the stud a tiny haircut, not a lobotomy. The main body of the stud, where the real stress is, remains untouched. It's a calculated risk, and for most of us tackling this job, it's a perfectly acceptable one. If you're still sweating it, maybe consider getting a professional to press in a new stud, but where's the fun in that?
The 'It's Just One Whack' Defense
Remember that advice about hitting the old stud out? "One good whack and it's out." This is where you might get some pushback. Some folks will tell you that beating on pressed-in studs is a recipe for disaster, leading to mushroomed ends and ruined hubs. And yeah, if you're swinging like you're trying to win a lumberjack competition, they might have a point. But let's be real, most of us are aiming for a firm, decisive tap, not a full-on assault. The goal is to shock it loose, not to tenderize it. It's about efficiency, not brute force. You're not trying to break it, just encourage it to leave its comfortable home. It's a delicate dance, really.
Don't Ruin Your Wheel Bearings, Please!
This is less of a doubt and more of a plea from the universe. When you're trying to get that new stud seated, or even when you're hammering the old one out, it's easy to get a little… enthusiastic. That enthusiasm can easily transfer to your wheel bearings. A direct hit on the hub assembly can seriously damage those delicate bearings, turning a simple stud replacement into a much more expensive repair. So, while you're focused on the stud, keep an eye on where your hammer is landing. A little bit of care goes a long way. If you're unsure about the process, maybe take a moment to check out some basic car maintenance tips to get a feel for how these parts interact. It's better to be safe than sorry, especially when it comes to parts that keep your wheels spinning smoothly.
The Washer Trick: Pulling Studs Like A Pro

The Lug Nut's New Job: Stud Extractor
So, you've wrestled the caliper off, convinced the rotor to let go, and maybe even bent that pesky notched cover out of the way. Now comes the fun part: getting that new stud to actually stay in the hub. Sometimes, just hammering it in from the back isn't enough, or you're worried about giving your wheel bearing a concussion. That's where this little trick comes in. We're going to use a lug nut and some washers to pull the stud into place. Think of it as a tiny, very specific tow truck for your wheel stud.
When The Hub Decides To Spin Freely
Here's the snag: when you try to use that lug nut and washer combo to pull the stud in, the whole hub might just decide to spin along with it. This is super annoying. You've got the parking brake on, the car's in park, but nope, the hub is having none of it. You might need to get creative here. Some folks brace it with a big pipe and a helper, or if you're lucky, you might have just enough friction left to get it started. The key is to get that stud seated enough so it doesn't spin anymore.
Avoiding The 'Almost There' Stud Disaster
When you're pulling the stud in with the lug nut and washers, pay attention. You don't want to run out of threads on the stud before it's fully seated. You're looking for the stud to be flush with the hub surface on the back. If you keep going too far, you might strip the threads on the stud or the lug nut, and then you're back to square one, but with more frustration. It's a delicate balance of pulling power and knowing when to stop.
Here's a quick rundown of what you'll need for this part:
- A few sturdy washers (thick ones are best)
- Your lug nut (the one you'll use to tighten the wheel later)
- A socket wrench that fits your lug nut
- A breaker bar or a long wrench for leverage
Remember, the goal is to pull the stud in smoothly. If it feels like you're forcing it too much, stop and reassess. Sometimes a few gentle taps from the back can help align it before you start pulling.
Want to get studs out like a pro? Our "Washer Trick" guide shows you how. It's a simple method that makes a big difference. Stop struggling and start fixing. Visit our website to learn this easy technique and get your car projects done faster!
So, You Survived Changing a Wheel Stud?
Alright, you did it. You wrestled that stubborn wheel stud into submission, probably with a few choice words and maybe a minor grease stain on your favorite shirt. If you're reading this, it means you didn't throw your tools across the garage in a fit of rage, and that's a win in my book. You’ve stared into the abyss of automotive repair and come out the other side, slightly more mechanically inclined and definitely with a story to tell. Now go forth and impress your friends with your newfound, albeit hard-won, wheel stud changing prowess. Or, you know, just call a tow truck next time. No judgment here.
Frequently Asked Questions
Do I really need to take off the axle nut to change a wheel stud?
Normally, yes, you'd have to remove the big axle nut. This usually needs a special socket and sometimes a powerful air tool to loosen. But, there's a trick! By carefully bending a small part of the metal cover behind the rotor, you can often get enough wiggle room to slide the new stud in without removing the axle nut. It saves a lot of hassle.
What tools will I need for this easier stud replacement method?
You'll need some basic tools. A flathead screwdriver for prying, a hammer for tapping, and a grinder to modify the new stud are key. You'll also need a socket wrench (around 19mm for some cars, 14mm for others) to remove the brake caliper bolts. A pair of channel locks can help hold the stud steady while grinding.
Is it safe to grind down a part of the new wheel stud?
Yes, it's generally considered safe for this specific method. You're only grinding down a small lip on the back of the stud. This is done to help it fit past the spindle at an angle when you're installing it without the axle nut. The main part of the stud that holds the wheel is untouched and remains strong.
How do I get the new stud into place without damaging anything?
After you've bent the metal cover out of the way and ground the new stud, you'll position the ground part against the spindle. Gently tap the stud in with a hammer. It might feel like you're forcing it, but as long as you're careful and the stud is properly ground, you won't damage the threads. Once it's past the spindle, hammer it flush against the hub.
What if the hub keeps spinning when I try to pull the new stud in?
This is a common problem! If the hub spins, you can't get enough leverage to pull the stud in with a lug nut and washers. Sometimes, putting the car in park, engaging the emergency brake, and using a pipe or pry bar to brace the hub against the ground can help stop it from spinning. This gives you the stability needed to tighten the lug nut and pull the stud in.
Can I really just hammer the old stud out and tap the new one in?
For this specific method, yes. While some might worry about damaging the wheel bearing or hub by hammering, this technique involves precise, firm taps rather than prolonged beating. The goal is to get the old stud out and the new one seated properly without excessive force. The key is to work carefully and use the right tools for the job.


