

Ever looked at your car’s wheel studs and wondered how they get so filthy? I did, and it bugged me enough to try a little experiment. I decided to see what happens if you clean some wheel studs and leave others dirty overnight. It was way messier than I expected, and I learned a lot about what really sticks to these little metal guys. If you’ve ever thought about giving your wheel studs a scrub, you might want to read this first. Here’s what I found out.
Key Takeaways
- Wheel studs pick up a surprising amount of grime from the road, brakes, and grease, even just sitting overnight.
- Cleaning wheel studs can be done with simple household items, but not every method works the same.
- Some cleaning tricks, like using foil and soda, can make a huge difference, while others are just a waste of time.
- Keeping your wheel studs clean might help with things like wheel wobble and even impress your mechanic.
- It’s easy to make mistakes, like using the wrong cleaner or over-scrubbing, and end up making things worse.
Why Wheel Studs Get Grubbier Than a Kid in a Mud Puddle
Let’s be real: wheel studs are the unsung grime magnets of every car. You think you know dirty? Just take a closer look at those little bolts holding your tire on—there’s a reason most of us pretend they aren’t there.
The Science of Stud Sullenness
Grime is practically in their job description. Wheel studs are exposed to every messy thing the road can throw their way—water, mud, salty slush, and whatever you drove through in that questionable parking lot behind the grocery store. What you end up with is a messy science experiment: moisture, metal, and air all meet up to create a perfect breeding ground for rust.
Here’s a quick breakdown of what attacks your studs:
- Rust: When water and oxygen combine, steel wheel studs start to corrode, leaving them spotty, orange, and unhappy.
- Road grime: Not just dirt. It’s oil from leaky cars, bits of tire, and mystery gunk that you don’t want to touch.
- Salt: In winter, your car might as well be taking salt baths—bad news for exposed metal.
If you’re wondering why your wheel studs seem to age ten years in one rainstorm, just blame science and move on.
Attack of the Rogue Brake Dust
Every time you hit the brakes, your pads and rotors have a little wrestling match. The loser? Tiny bits of metallic dust fly everywhere, and your wheel studs catch a lot of it. This brake dust:
- Sticks to studs like glue
- Turns nasty black or brown over time
- Is tricky to clean off unless you’re using the right stuff
And while you’re not going to win any awards for clean wheel hardware, brake dust is one reason they always look worse than you remembered.
Wheel Studs: Attracting Grease Like a Magnet
Ever noticed how wheel studs always look oily, even if you washed your car last week? Grease is everywhere on a car, and these little studs are in the middle of the action. Whether it’s from a sloppy bearing job or a tiny leak near the brakes, it finds its way to the wheel studs.
Here’s what your studs usually pick up on a typical drive:
| Source | What It Leaves Behind |
|---|---|
| Motor oil | Sticky film |
| Brake fluid | Oily residue |
| Steering grease | Thick, dark buildup |
Honestly, wheel studs are basically the lint trap of your whole suspension. They don’t stand a chance staying clean for more than a few hours, let alone overnight.
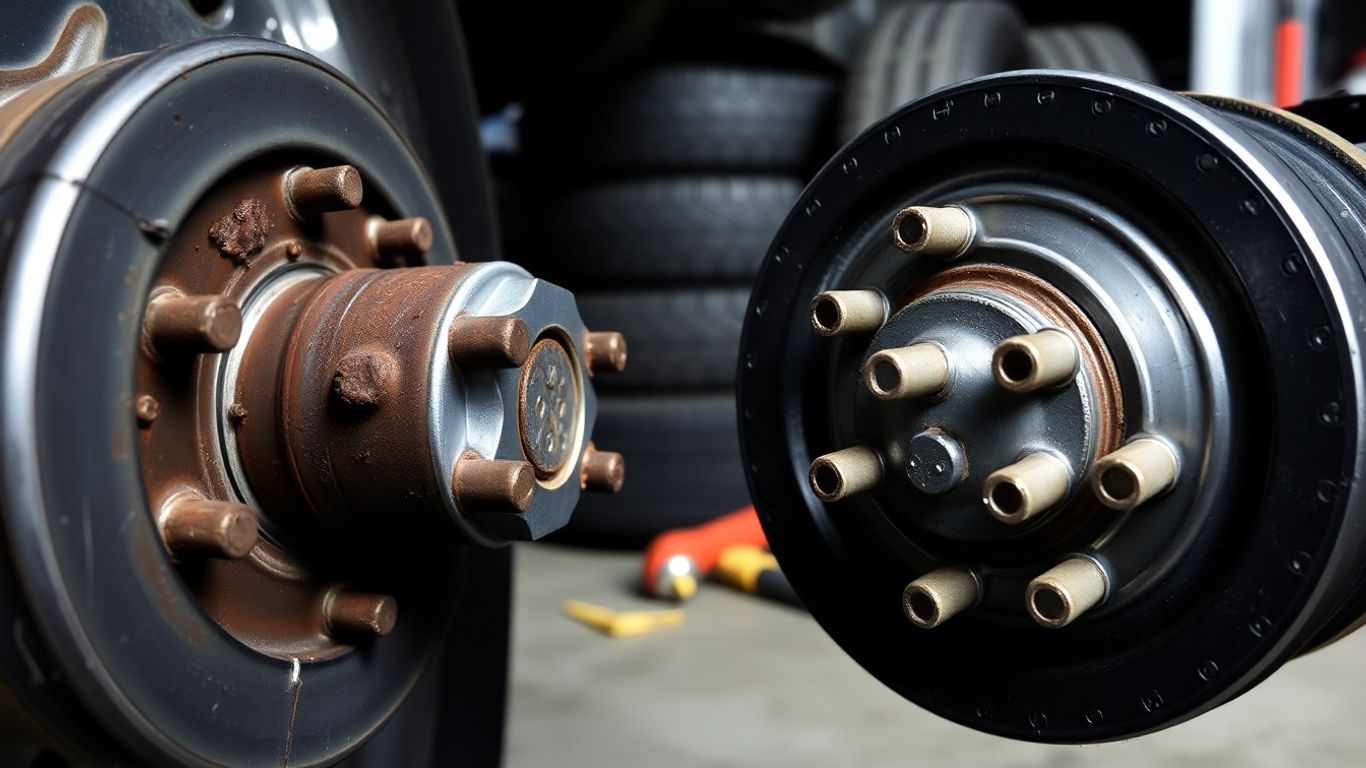
The Side-By-Side: Dirty Wheel Studs Versus Spotless Superstars
Let’s be honest—nobody brags about their wheel studs at car meets. But after one night of cleaning and a little patience, I’ve got opinions. Grab your flashlight and let’s see how gunked-up bolts and freshly shined studs stack up against each other in what might be the weirdest face-off you’ll read all week.
Snapping Shameful Close-Ups
I started my journey with one goal: make half the studs sparkle, and leave the other half as a living warning of what brake dust and road salt do over time. Zooming in with my phone, the difference was wild:
- Dirty studs: Patchy, gray, covered in sticky grime with bonus orange specks.
- Clean studs: Smooth, bright, just shy of blinding under sunlight (I swear I heard them thank me).
- The in-between: That awkward phase where half the dirt is gone, but what’s left looks like a failed science experiment.
| Dirty Stud | Clean Stud | |
|---|---|---|
| Color | Brown/Orange | Silvery/Chrome |
| Texture | Gritty/Chunky | Smooth/Glossy |
| Scent | Rusty/Metal | Mild, soapy fresh |
| Pride | None | Off the charts |
The Texture Test: Crunchy or Smooth?
If you’ve ever run your finger over a wheel stud (go ahead, try it—nobody’s watching), you know texture says a lot. Here’s how mine stacked up:
- Crunchy: Old grease, caked sand, and that weird flaky stuff made the dirty ones rough as tree bark.
- Smooth: The clean studs felt slick. Not ice-rink slick, but definitely miles away from their gritty twins.
- Sticky spots: Even with a scrub, a couple holdouts stayed tacky. Cleaning might need a repeat session.
You know you’ve done a good job when your fingertips slide off the stud like a cartoon banana peel.
How Many Colors Can One Wheel Stud Be?
I did not expect the rainbow—let’s call it the unintentional ombré effect—that showed up after months of neglect. Rust, grease, and mystery stains teamed up on the dirty studs. Post-wash? A uniform, shiny look that can only mean one thing: my rolling hardware finally gets some appreciation.
- Dirty Studs:
- Brown (hello, rust)
- Black streaks (thanks brake dust)
- Orange dots (the bad kind)
- Clean Studs:
- Silver (and nothing else)
If you ever needed a push to clean your wheel studs, just know corrosion isn’t just ugly—it can eat away at your wheels and cause problems, including serious wheel damage. A clean stud can’t stop traffic, but maybe you’ll stop hearing that annoying squeak.
Let’s be honest: clean wheel studs might not make you a hero, but they’ll definitely keep things rolling smoother than their dirty, rainbow-splattered cousins.
Bath Time for Wheel Studs: DIY Cleaning Hacks and Fails
Who knew your car could use a spa day? Splash some vinegar in a cup, add a dash of baking soda, and you’ve got a fizz worthy of a middle-school science project. Dunk your wheel studs for 10-15 minutes. If the studs still look sad, give ‘em a gentle scrub with a soft brush. Rinse well so your driveway doesn’t smell like pickles for a week.
But heads up: soaking too long can sometimes make them even grayer than before. Go easy on the timing.
- Wear gloves unless you want your hands to smell like a salad.
- Rinse thoroughly to avoid sticky residue.
- Dry completely to fight off sneaky future rust.
Sometimes after soaking overnight, it honestly looks like nothing happened except you wasted a perfectly good cup of vinegar.
Toothpaste isn’t just for your teeth (or that awkward zit you want gone by morning). Smear a pea-sized blob on each stud, then scrub with an old toothbrush. Let sit for a couple minutes, rinse, and admire the shine—or the new streaks you’ve created.
| Method | Cleanliness (1-5) | Mess Factor (1-5) | Effort Level (1-5) |
|---|---|---|---|
| Paste + Brush | 4 | 3 | 2 |
| Just Vinegar | 2 | 1 | 3 |
Toothpaste can be a champion for light dirt but just gives a minty essence to the truly stubborn stuff.
You know what sometimes works best? Rolling up your sleeves and scrubbing the heck out of those studs. Forget complicated recipes—grab a wire brush, some determination, and maybe your favorite tunes. Scrub until your arms want to fall off, and you might just see some progress.
Here’s a solid wheel stud cleaning routine:
- Put on gloves (for both style and safety).
- Use a sturdy brush (not your sister’s hairbrush).
- Wipe with a rag between scrubs to check your work.
Pro tip: When regular scrubbing isn’t cutting it, consider a tool designed specifically for the job, like the Automotive Stud Kleen, which can attach to an impact wrench and make the task a whole lot easier (and way less boring).
If all else fails, at least you managed an upper-body workout while the studs stayed stubbornly grungy.
So, whether you’re soaking, scrubbing, or pasting, sometimes the results are magical, and sometimes, well, you learn what doesn’t work. Either way, your wheel studs will never know what hit them.
What REALLY Happens Overnight: The 8-Hour Tarnish Challenge

Ever wonder what your wheel studs get up to at night? No? Well, I did. That's why I decided to set up my own midnight science lab (bedhead included) to see how dirty and clean wheel studs would handle eight full hours of darkness and dew. Here’s the play-by-play:
- Started with two sets of wheel studs – one left gloriously grimy, one scrubbed so hard it nearly squeaked.
- Laid them out on my driveway, away from the neighbor’s weird cat but close enough to the sprinklers for a little moisture drama.
- Waited. And waited. Okay, I actually just went to sleep – no way was I staying up all night with car parts.
Sometimes the most exciting stuff happens when you’re not even looking. Like, seriously, nobody dreams about oxidizing metal – except maybe me after too much late-night pizza.
Shocking Morning Results
You’d think nothing much would change in eight measly hours, right? Wrong!
| Wheel Stud Status | Before Bed | Morning After |
|---|---|---|
| Dirty | Sticky, black, gritty | Sticky, black, grimier |
| Clean | Sparkly, smooth, shiny | Dull, speckled, duller |
Here’s what hit me the second I stepped outside:
- The dirty studs somehow gained new layers of gunk, like they were snacking on road debris all night long.
- The clean studs, once the pride of my toolbox, had picked up a sad smattering of orange spots and streaks. Turns out, metals don’t even need daylight to find trouble!
- Dampness seemed to encourage all sorts of weird splotches and dryness just made the clean ones look tired.
Which Wheel Studs Survived the Night?
After my little overnight experiment, I’d say neither group came out looking good around sunrise. The dirty ones doubled down on grossness, still rough to the touch and now somehow stickier. The clean ones lost some of their sparkle, but at least they didn’t feel like sandpaper.
So, who survived?
- If survival means piling on more dirt, the dirty studs win by a landslide (not a prize, folks).
- The clean studs held up okay but showed they need some after-care if I want to keep impressing people at the next tire rotation.
- Lesson learned: Humidity rules all.
If you’re hoping your freshly-cleaned wheel studs will stay perfect overnight, you’re in for a rude awakening come morning. The 8-hour tarnish challenge proves Mother Nature always has the last laugh – and she’s kind of a jerk about it.
Tools and Gadgets That Make Cleaning Wheel Studs Almost Fun
Why Your Toothbrush May Stage a Revolt
Don't feel bad when your old toothbrush finally gives up. Scrubbing wheel studs isn't what it signed up for, after all. But honestly, the toothbrush is a classic for a reason: it gets in all those weird nooks, works with whatever paste or cleaner you throw at it, and is always hanging around when you need it. Just don't expect it to look (or smell) the same afterwards. For the pro-level clean, though, nothing comes close to the heavy-duty Truck Stud Kleen tool—made for commercial situations but surprisingly fun to use even if you’re not running a fleet! You can get the lowdown on faster, safer cleaning with tools designed especially for studs on this truck hub cleaning tool.
- Retired toothbrush
- The purpose-built cleaning tool
- Good old finger workout (when you're desperate)
It's weirdly satisfying to watch years of gunk spin off a stud—like the world's least glamorous magic trick.
Microfiber Myths and Legends
You heard it from your neighbor, your uncle, and that guy down the street: microfibers make things cleaner than clean. But do they really? One side is fluffy, the other side is smooth, and both sides end up gross after two studs. The magic lies in the fibers trapping dust instead of spreading it. Don’t be fooled, though, they’re not invincible—the really stubborn grime laughs in the face of microfibers. Still, they're gentle, reusable, and less likely to make your hands smell weird.
Here’s what microfiber cloths actually excel at for studs:
- Polishing up after you’ve done the hard part
- Wiping down for a streak-free finish
- Blotting up stubborn splashes (because you know they'll happen)
Foil, Soda, and Hot Water: The Recipe for Wheel Stud Bliss
There’s nothing like seeing basic kitchen stuff tackle car filth. Grab some aluminum foil, sprinkle a little baking soda, and get a pot of hot water—suddenly, the science project is on. You make a paste, blob it on, and wrap up the stud like a shiny burrito. Wait a little, rub a little, rinse, and you’ve either made the stud shinier or have a new mess. Some call it magic, others just like the bubbles. Every time I try this I wonder if I could’ve just made cookies instead, but hey, it works well for a budget hack.
| Tool | Mess Removal | Fun Factor (1–5) | Reusability |
|---|---|---|---|
| Toothbrush | Good | 3 | Low |
| Microfiber | Okay | 2 | High |
| Foil & Baking Soda | Decent | 4 | Low |
| Truck Stud Kleen | Excellent | 5 | Medium |
So if you like gadgets or just really hate stubborn grime, it’s not hard to make your wheel studs sparkle with a little ingenuity—and maybe an old toothbrush that’s already thinking about retirement.
Can Clean Wheel Studs Change Your Life (or Just Your Commute)?
Picture this: you’re cruising along, the windows are down, and you have clean wheel studs. Does your heart race a bit? No? Well, maybe it should! Keeping your studs wash-day fresh might sound excessive, but the truth is, there are more perks than just shiny hardware.
Preventing the Dreaded Wheel Wobble
A filthy wheel stud isn’t just visually offensive. Built-up grime can ruin the connection between your wheels and your ride, making each bump in the road a little more dramatic than you’d like. If you ever thought your car was moonwalking at highway speeds, you might just need to show some TLC to the studs.
• Gunk causes uneven pressure
• Dirt interferes with proper wheel seating
• Corrosion leads to stubborn lug nuts (and frustration is almost guaranteed)
Trust me, nothing ruins a morning like spending half an hour trying to muscle off a nut glued in place by last month’s road salt. For fast, effective rust and debris removal, some folks rely on things like the Stud Kleen Disc to keep everything snug and safe.
Does Clean Mean Faster?
Let’s not get carried away—no one’s shaving seconds off their 0-60 time just by cleaning wheel studs (unless you count the seconds you save not waging war with jammed lug nuts!). But the difference in service time at the shop or roadside is real when nothing sticks.
| Condition of Studs | Wheel Change Time (min) | Amount of Swearing |
|---|---|---|
| Spotless | 5 | Low |
| Kinda Dirty | 9 | Medium (mild cursing) |
| Seriously Grimy | 17 | High (everyone hears) |
One thing is clear: a clean stud is a happy stud, and a happy stud makes for a happier you.
Impressing Your Mechanic with Sparkliness
You might not care about the look of your wheel studs, but the next time you drop your car off, wait until you see the mechanic’s reaction. When they see those spotless studs, you might get a nod of genuine respect—or at least a less-judgmental sigh.
- No raised eyebrows at service
- Fewer unsolicited lectures about “rust damage”
- Maybe (just maybe!) a discount on labor
Think of smooth, clean wheel studs as your ticket to faster fixes and fewer headaches. While you won’t win any beauty contests at the car shows, you’ll definitely avoid the hall of shame at your local garage.
So yes, clean wheel studs just might improve your commute—and they’ll make you feel like a real adult, at least until you spill coffee on your pants before work again.
Top Wheel Stud Missteps: The Oops, Oh No, and Never Again List
Ever thought a household snack could double as a cleaning agent? Someone on the internet probably has. But just because peanut butter can clean fingerprints off glass, that doesn’t mean it belongs anywhere near your wheel studs. Oils and sugars can turn grime into something even tougher to scrub, not to mention the real risk of attracting small animals to your driveway. Here's a quick rundown of substances you should keep far away from your precious studs:
- Mayonnaise 🍔 (because, why?)
- Household bleach (corrosion city)
- Peanut butter (leave it for sandwiches)
Sometimes, if it sounds like a joke, it probably is—so always check before making your car smell like a picnic gone wrong.
How Not to Strip Your Threads
We've all been there: you’re feeling enthusiastic, and suddenly the ratchet slips. Hello, cross-threading! Wheel studs are not a place to experiment with brute force. Here’s how these mishaps usually happen:
- Over-tightening with the wrong size wrench.
- Threading the nut at an awkward angle.
- Using power tools where a gentle hand is needed.
| Mistake | What Happens | Fixes Needed |
|---|---|---|
| Over-tightening | Stripped threads | Replacement stud |
| Wrong angle | Cross-threaded nut | Rethreading or cut |
| Power tool abuse | Broken studs | Drill & replace |
Remember, no one ever won a trophy for most-torqued wheel stud (that’s not a thing).
The Once-Golden Stud, Now Blackened Forever
You were so proud of those shiny, golden wheel studs. Then you decided to try that viral hot-water-and-soda trick, only to wake up to studs that look like they’ve been used in a fireworks factory. Chemistry and car parts don’t always mix, and certain metals just… react very badly.
- Baking soda and vinegar: Great for volcano projects, not so great for wheel studs.
- Harsh soaps: Say goodbye to any finish if you’re not careful.
- Abrasive pads: Sure, they’ll remove grime, but also any hints of shine you had left.
Your best cleaning friend is something mild—so don’t let curiosity ruin those studs forever.
Next time you’re planning a cleaning marathon, skip the wild experiments, stick with tried-and-true cleaners, and don’t trust every hack you see online. Your wheel studs—and maybe your pride—will thank you.
Avoiding mistakes with your wheel studs is important for safe driving. Want to make sure your studs are clean and in great shape? Our easy-to-use cleaning tools make the job simple and fast. Don’t let small errors turn into big problems—check out our website for tips and tools that will help you avoid these common missteps!
Conclusion: The Studs Have Spoken
Well, after a night of letting my silver studs stew in their own filth (and then in a cleaning solution), I can honestly say I’ll never look at jewelry the same way again. Dirty studs are like that one sock you find under the bed—surprisingly gross, but weirdly satisfying to clean. The clean ones? They shine so bright, I’m pretty sure my cat is plotting to steal them. So if you’re on the fence about giving your jewelry a bath, just do it. Your studs will thank you, your ears will thank you, and you might even find a long-lost earring in the process. Just remember: don’t leave them soaking for a week, and maybe take a before-and-after photo for bragging rights. Happy cleaning, and may your studs always be sparkling (and not sticky)!
Frequently Asked Questions
Why do my wheel studs get dirty so fast?
Wheel studs get dirty quickly because they're close to your brakes, which create dust. Road dirt, grease, and water also stick to them, making them look grimy in no time.
What’s the easiest way to clean wheel studs at home?
A simple way is to use warm soapy water and an old toothbrush. Scrub gently, then rinse and dry. For tough spots, you can try vinegar or baking soda, but always rinse well after.
Can I use toothpaste to clean my wheel studs?
Yes, toothpaste can help remove light stains and make studs shiny. Just put a small amount on a toothbrush, scrub the stud, and wipe it clean with a cloth.
Will cleaning my wheel studs help my car run better?
Clean wheel studs won’t make your car faster, but they can help prevent problems like stuck wheels or wobbles. Clean studs also make it easier to change tires.
Is it okay to use any cloth to clean wheel studs, or do I need something special?
You can use any soft cloth, but microfiber cloths work best because they don’t leave lint and are gentle on metal. Avoid rough materials that might scratch the studs.
How often should I clean my wheel studs?
You don’t need to clean them all the time. Doing it every few months, or whenever you change your tires, is usually enough to keep them in good shape.


