

Working on your bike's hubs can seem like a big job, especially if you're new to it. You might wonder if you need a whole workshop of fancy gear or if your basic tools will cut it. Honestly, it's a mix of having the right stuff, knowing how to use it, and just being willing to take your time. Let's break down what you really need to get those hubs spinning smoothly again.
Key Takeaways
- Having the right basic tools like screwdrivers and wrenches is a good start for many hub tasks.
- Specialized hub tools, like cone wrenches and bearing presses, are often needed for more in-depth maintenance.
- Knowing how to read instructions and not forcing parts are key skills to avoid damage.
- Patience is super important; taking breaks and accepting mistakes can save you a lot of frustration.
- For complex issues or if you're unsure, it's often best to seek professional help or consider replacing the part.
The Almighty Toolkit: Your First Line of Defense (or Offense)
Alright, let's talk tools. Before you even think about touching your bike's hub, you need the right gear. Trying to fix something complex with a butter knife and sheer willpower is a recipe for disaster, or at least a very greasy, frustrating afternoon. Think of your toolkit as your trusty sidekick. It won't judge you when you inevitably drop a tiny bolt for the fifth time, and it's there to help you get the job done.
Screwdrivers: More Than Just Pointy Sticks
Seriously, don't underestimate these guys. You'll need a few different types. A Phillips head (the one with the cross shape) is your go-to for most bike screws. But you'll also want a flathead, because sometimes, life throws you a curveball (or a flathead screw). Having a set with various sizes is key. Trying to use a screwdriver that's too big or too small is like trying to fit a square peg in a round hole – it just doesn't work and can strip the screw head.
Wrenches and Socket Sets: The Nut Crackers
These are your heavy hitters for anything involving nuts and bolts. A good adjustable wrench is handy, but for bike work, a socket set is where it's at. Look for a set with both metric and imperial sizes, just in case your bike is feeling particularly international. A 6-point socket set is generally preferred over a 12-point one because it grips the nut better and is less likely to round off the corners. You'll be surprised how often you'll need these.
Pliers: The Grippy Gang
When you need to hold something steady, twist something stubborn, or just generally get a better grip, pliers are your best friend. You'll want a few types: standard slip-joint pliers for general grabbing, needle-nose pliers for getting into tight spots, and maybe some locking pliers (like Vise-Grips) for when you really need something to stay put. They're like the multi-talented members of your toolkit, always ready for action.
Having the right tools isn't about showing off; it's about making the job easier, safer, and less likely to end with a trip to the emergency room or a call to a professional. Invest in decent quality tools – they'll last longer and perform better, saving you headaches in the long run.
When Hub Tools Become Your Best Frenemies
Alright, so you've got your basic toolkit, feeling pretty good about yourself, ready to tackle that hub. But then you realize, oh boy, some jobs need special tools. These aren't your everyday screwdrivers; these are the specialized gadgets that make you question your life choices. They're called 'frenemies' because they're essential for the job, but they can also be a real pain if you don't know what you're doing.
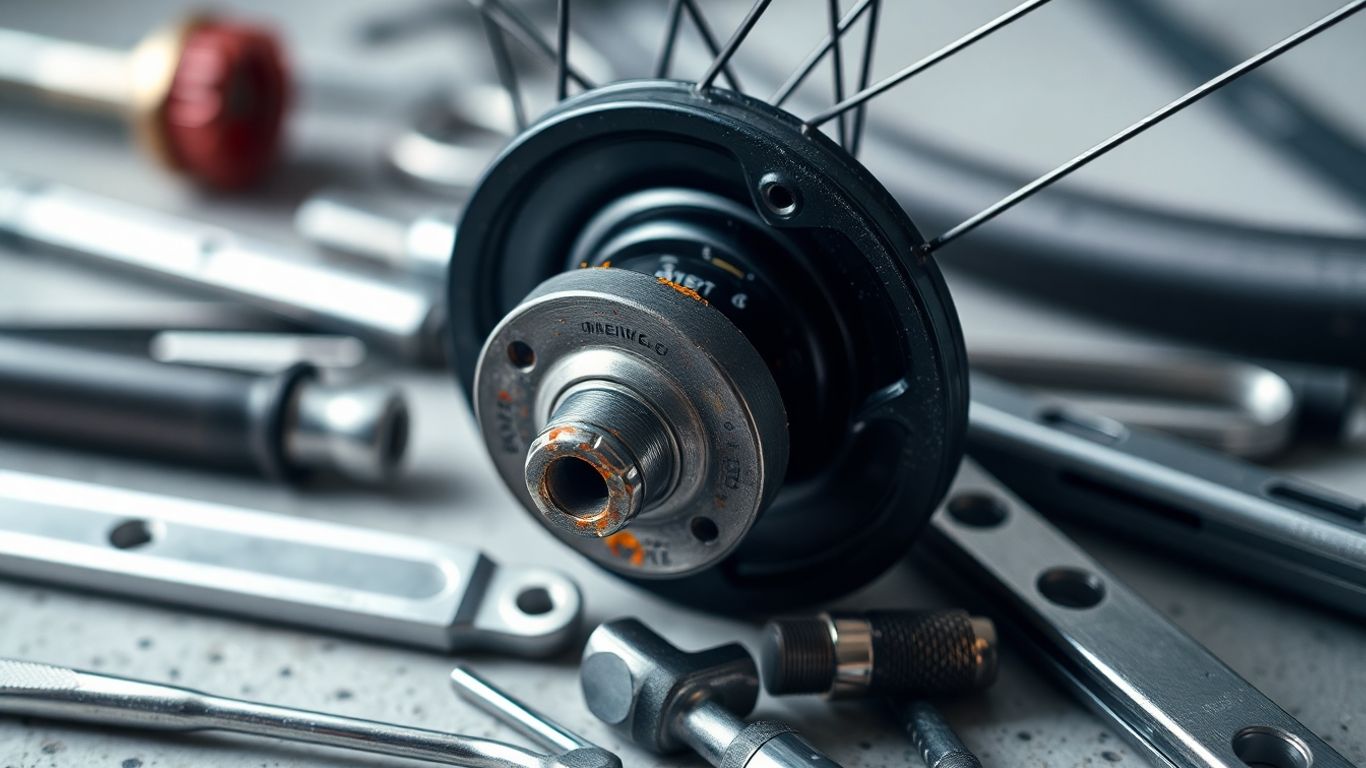
The Mystical Cone Wrench: A Hub's True Love
Forget your standard adjustable wrench; the cone wrench is a slim, flat tool designed to fit those narrow locknuts on older style cup-and-cone bearings. It's the only tool that truly understands a hub's inner workings. Using the wrong wrench here is like trying to pick a lock with a butter knife – messy and ineffective. You'll likely need a couple of different sizes, depending on your hub's vintage. Trying to force it with a regular wrench can round off those delicate nuts faster than you can say 'oops'.
Bearing Presses: For When Things Get Tight
So, you've decided to replace those worn-out bearings. Great! Now you need to get the new ones in. This is where a bearing press comes in. It's basically a fancy vise that applies even pressure to seat the new bearings perfectly. Trying to hammer them in with a socket and a mallet? Yeah, don't do that. You'll likely damage the new bearings or, worse, the hub shell itself. There are bench-mounted versions and portable ones, each with its own quirks. For electric bike hub maintenance, specific tools might be needed to avoid damaging the motor components [0fab].
Spoke Wrenches: The Wheel Whisperers
If you're dealing with spoke tension or truing a wobbly wheel, you'll meet the spoke wrench. These little guys grip the spoke nipple and allow for tiny, precise adjustments. They come in different sizes, so make sure you get the right one for your nipples. It's a delicate dance, turning each spoke just a quarter-turn at a time, listening to the wheel's subtle complaints. Too much force, and you'll strip the nipple or break a spoke. It requires a good amount of patience and a feel for what the wheel is telling you.
These specialized tools aren't just fancy additions to your toolbox; they are often the only way to perform certain hub maintenance tasks without causing damage. Investing in the right ones, even if they seem obscure, can save you a lot of headaches and money in the long run.
Skills: The Secret Sauce (or Just Not Breaking Stuff)
Alright, so you've got the tools. Shiny, new, maybe a little greasy. But tools are just fancy metal sticks without the know-how, right? This is where skills come in. Think of it as the difference between having a really expensive hammer and actually knowing how to hit a nail without bending it into a pretzel. It’s about not turning a simple hub clean into a full-blown mechanical meltdown.
Reading the Manual: Because Guessing is for Amateurs
Look, I get it. Manuals are about as exciting as watching paint dry, especially when there's a perfectly good YouTube video showing some dude with impossibly clean hands doing the job in five minutes. But here’s the thing: those videos often skip the tiny details that save you hours of frustration. The manufacturer actually put that manual together for a reason. It tells you what specific torque settings to use (don't just crank it till it groans!), which parts are delicate, and what weird proprietary tool you might actually need. It’s your first line of defense against turning your bike into a very expensive, very stationary art project. For some specific issues, like dealing with e-bike hub motor rubbing, the manual or a specialized guide is your best bet.
The Art of the Gentle Turn: Don't Overtighten!
This is a big one, folks. We’ve all been there, trying to get that last little bit of tightness on a bolt, only to hear a sickening crack or feel the threads just… give up. Overtightening is the silent killer of bike parts. It can strip threads, crack casings, and generally make a mess of things. Remember, snug is usually good. If you’re not sure, it’s better to be a little loose and check it again later than to be permanently tight and broken.
Here’s a little cheat sheet for common fasteners:
| Part | Tightness Level | Notes |
|---|---|---|
| Axle Nuts | Snug | Don't need to be a gorilla. |
| Handlebar Bolts | Firm | Check torque spec if available. |
| Pedal Threads | Snug | Grease them first! |
| Derailleur Bolts | Firm | Small bolts, easy to strip. |
Troubleshooting: When Things Go Sideways (Literally)
So, you’ve done the work, and now your wheel has a wobble that could double as a disco ball effect, or maybe your gears are making sounds that resemble a dying badger. Don't panic! Troubleshooting is just a fancy word for figuring out what went wrong and how to fix it. It usually involves a bit of detective work:
- Revisit the steps: Did you miss something in the manual or the video?
- Inspect visually: Look for anything obviously out of place, bent, or loose.
- Isolate the problem: Try to narrow down where the noise or wobble is coming from.
Sometimes, the best troubleshooting step is to simply walk away for a bit. Go grab a coffee, stare blankly at a wall, and let your brain reset. You'd be amazed at what you can spot with fresh eyes.
If you've tried everything and you're still stumped, it might be time to admit defeat and call in a professional. There's no shame in knowing your limits, especially when it comes to keeping your ride safe and functional.
Patience: The Unsung Hero of DIY Disasters
Alright, let's talk about the real MVP of any DIY project that involves tiny bike parts and questionable YouTube tutorials: patience. You've got your shiny new tools, you've watched enough videos to feel like a pro (spoiler: you're not), and you're ready to tackle that hub. Then, reality hits. A tiny spring goes rogue, a bearing decides to play hide-and-seek, or you realize you've somehow put something back together backward. This is where your toolkit takes a backseat and your inner zen master needs to show up.
The 'Take a Break' Technique
This is less a technique and more a survival strategy. When you feel that familiar urge to throw a wrench across the garage (or worse, at your bike), stop. Seriously. Walk away. Go make a sandwich. Watch a cat video. Your brain needs a reset, and your bike doesn't need to be the recipient of your frustration. Come back with fresh eyes, and you might just spot that tiny washer you overlooked.
Embracing the 'Oops' Moment
Mistakes happen. It's part of the DIY charm, right? You might strip a bolt, cross-thread something, or accidentally launch a bearing into the stratosphere. Instead of spiraling into a pit of despair, try to see it as a learning opportunity. Maybe you discover a new, albeit unconventional, way to remove a stubborn part, or you learn the hard way why reading the manual is actually a good idea. It's all part of the adventure.
When to Call for Backup (Before You Weep)
There's a fine line between determined DIYer and someone about to cause irreparable damage. If you've tried the 'take a break' technique multiple times, consulted every forum known to man, and are starting to have conversations with your bicycle parts, it might be time to admit defeat. Not defeat for the bike, but defeat for your current skill level.
Here's a little flowchart to help you decide:
| Situation | Action |
|---|---|
| Frustration level: Mildly Annoyed | Keep trying, maybe take a short break. |
| Frustration level: Wanting to Hulk out | Definitely take a break. |
| You've lost a tiny part (again) | Consider calling a friend or shop. |
| You're pretty sure you've made it worse | It's probably time for backup. |
| You're crying into a greasy rag | Call for backup. No shame in tears. |
Calling a local bike shop or a more experienced friend isn't a sign of weakness; it's a sign of wisdom. They might have that one obscure tool, or just the right words of encouragement (or a good laugh at your expense) to get you back on track. Plus, they might save you from buying a whole new hub.
Beyond the Basics: Advanced Hub Shenanigans
Alright, so you've wrestled with your hub, maybe even coaxed it into submission. But what happens when things get a little more… involved? We're talking about the deep cuts, the stuff that makes you question your life choices and consider a career in competitive napping. This is where we venture into the advanced territory of hub maintenance, where things can get sticky, literally.
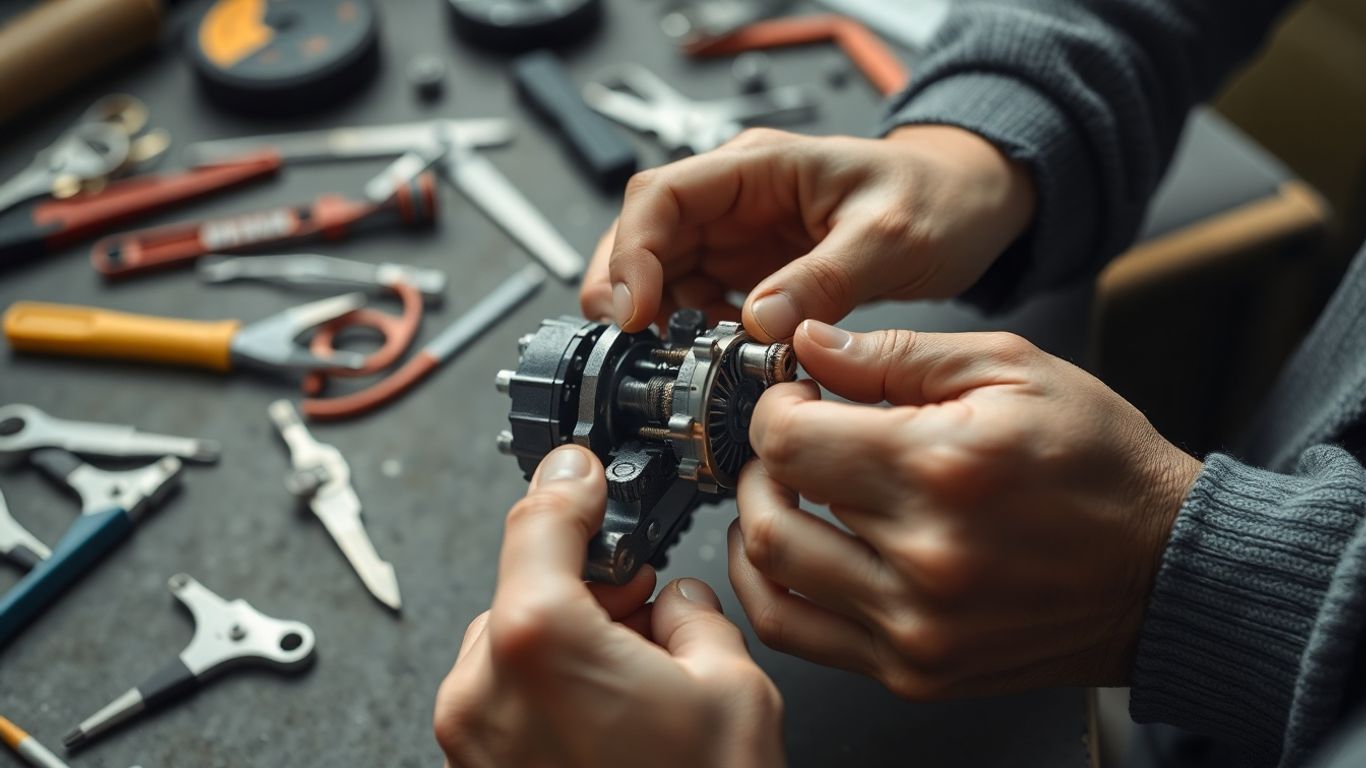
Freehub Body Fiddling: A Delicate Dance
Ah, the freehub body. This is the part that lets you coast, that magical mechanism that allows you to pretend you're not pedaling while still moving forward. Sometimes, these little guys get gunked up, or worse, the pawls (those tiny teeth that make the clicking sound) decide to take a vacation. Replacing or servicing a freehub body can be a bit fiddly. You'll often need a specific tool to hold it in place while you unscrew the main hub nut. It’s like trying to perform brain surgery with oven mitts on. Make sure you know which type of freehub you have – Shimano, SRAM, Campagnolo – they all have their quirks. Getting the right replacement parts is key, and sometimes it's easier to just grab a whole new freehub body if yours is truly toast.
Servicing Sealed Cartridge Bearings: The 'Replace' Option
Many modern hubs use sealed cartridge bearings. These are great because they're pretty low maintenance. You don't grease them like the old cup-and-cone style. When they get rough, gritty, or just plain noisy, the usual advice is to just replace the whole cartridge. Trying to pry them open and regrease them is often a losing battle and can lead to more damage. You'll need a bearing press or a makeshift setup to get the old ones out and the new ones in without damaging the hub shell. It’s not exactly rocket science, but it does require a bit of finesse and the right tools.
When to Just Buy a New Hub (and Save Your Sanity)
Let's be honest, sometimes you've tinkered, you've sweated, you've possibly uttered words that would make a sailor blush, and the hub is still not cooperating. There comes a point where the cost of parts, specialized tools, and your rapidly dwindling sanity outweighs the benefit of fixing the old one. If your hub shell is cracked, if the threads are stripped beyond repair, or if you've spent more time on it than a professional mechanic would charge for a full rebuild, it might be time to wave the white flag. Consider it an investment in future, less-stressful bike rides. Sometimes, the best maintenance is knowing when to call it quits and get something new.
Want to take your car care skills to the next level? Our section "Beyond the Basics: Advanced Hub Shenanigans" dives deep into tricks and tips that go beyond the usual. Learn how to really make your wheels shine and perform their best. Ready to become a car care pro? Visit our website today to explore these advanced techniques and more!
So, What's the Verdict?
Alright, so we've talked tools, we've talked skills, and we've definitely talked about patience – mostly the lack thereof. It turns out that fixing that leaky faucet or wobbly bike isn't always as simple as a five-minute YouTube video suggests. Sometimes you need the right gizmo, sometimes you need to actually know what you're doing, and sometimes you just need to not throw the whole thing out the window. The good news? You probably have more patience than you think, and those fancy tools aren't going anywhere. So, go forth, grab a wrench (or maybe just your phone to call a pro), and remember: a little bit of effort, even if it ends in a minor disaster, is still an adventure. Probably.
Frequently Asked Questions
What are the most basic tools I'll need for simple bike hub maintenance?
For starters, you'll want a good set of screwdrivers (both flathead and Phillips) and some wrenches. Pliers are also super handy for gripping and turning things. Think of these as your everyday tools for most small fixes.
Are there special tools just for bike hubs?
Yes, there are! Things like cone wrenches are specifically designed to adjust the bearings inside your hub. You might also run into bearing presses for when things are really snug, and spoke wrenches for keeping your wheel straight. They're a bit more specialized but can be lifesavers.
How important is it to read the bike's manual or instructions?
It's really important! Trying to fix something without knowing how it works is like trying to build furniture without instructions – you're likely to mess it up. Manuals give you the right steps and warn you about tricky parts.
What does 'don't overtighten' mean when working on my bike?
It means don't crank down on bolts and screws too hard. If you tighten them too much, you can damage the threads, crack parts, or make it impossible to loosen them later. Being gentle is often better than being strong!
When should I consider taking my bike to a professional instead of fixing it myself?
If a repair seems really complicated, requires a lot of super-specialized tools you don't have, or if you're worried about causing more damage, it's probably time to call a bike shop. Sometimes, paying an expert saves you a lot of stress and potential extra costs.
What's the deal with sealed cartridge bearings versus traditional bearings?
Traditional bearings have loose balls you can grease and adjust. Sealed cartridge bearings are like little self-contained units. Often, if a sealed bearing goes bad, it's easier and sometimes cheaper in the long run to just replace the whole cartridge rather than try to fix it.


