

Ever run into a situation where a simple bolt or stud just won't behave? You know, the kind that wiggles when it should be solid, or makes a noise that drives you nuts? It's a common headache for anyone who works on cars or machines. This article is all about those tricky studs and the clever ways people have come up with to fix them, from old-school tricks to modern solutions. We'll explore why these little metal pieces can be such a pain and how mechanics and tinkerers alike have found ways to get them to stay put, making their jobs a whole lot easier. Think of it as a guide to conquering the common, yet annoying, stubborn stud.
Key Takeaways
- Loose studs can cause annoying noises and fitment issues, especially with components like heim joints.
- Various methods exist to secure studs, ranging from simple glues like Loctite to more involved mechanical fixes.
- The conical seat design of some studs presents a unique challenge that often requires specific solutions.
- Machinists can create custom parts like shouldered studs or adapter sleeves for precise fits.
- Creative use of materials like rubber bushings or shim stock can sometimes solve stud looseness without major modifications.
The Stud That Wouldn't Stay Put
So, you've got a stud. It's supposed to be a solid, dependable piece of metal, right? Well, sometimes, studs have other ideas. They decide they'd rather be a bit more… flexible. This is where the real fun begins, especially when you're dealing with suspension components where a little wiggle can turn into a whole lot of clunk. We're talking about those moments when a perfectly good stud suddenly feels like it's got more play than a toddler in a bouncy castle.
A Tale of Wiggle and Wobble
Picture this: you've just installed a new part, feeling pretty smug about your mechanical prowess. Then, you hit a bump. Or maybe just a slight imperfection in the road. And you hear it. That subtle, yet infuriating, rattle. It’s the sound of a stud that’s decided it prefers a bit of a dance. This isn't just annoying; it can mean premature wear on other parts, or worse, a safety issue. The goal is simple: eliminate that unwanted movement.
When Your Studs Have More Slop Than A Toddler's Diaper
We've all been there. You measure the stud, you measure the hole, and they should be a perfect match. But somehow, there's a gap. Not a huge, gaping chasm, mind you. We're talking a few thousandths of an inch. Just enough to let things shift, to create that dreaded clunk when the suspension cycles. It’s like trying to fit a square peg into a slightly-too-round hole, but with metal.
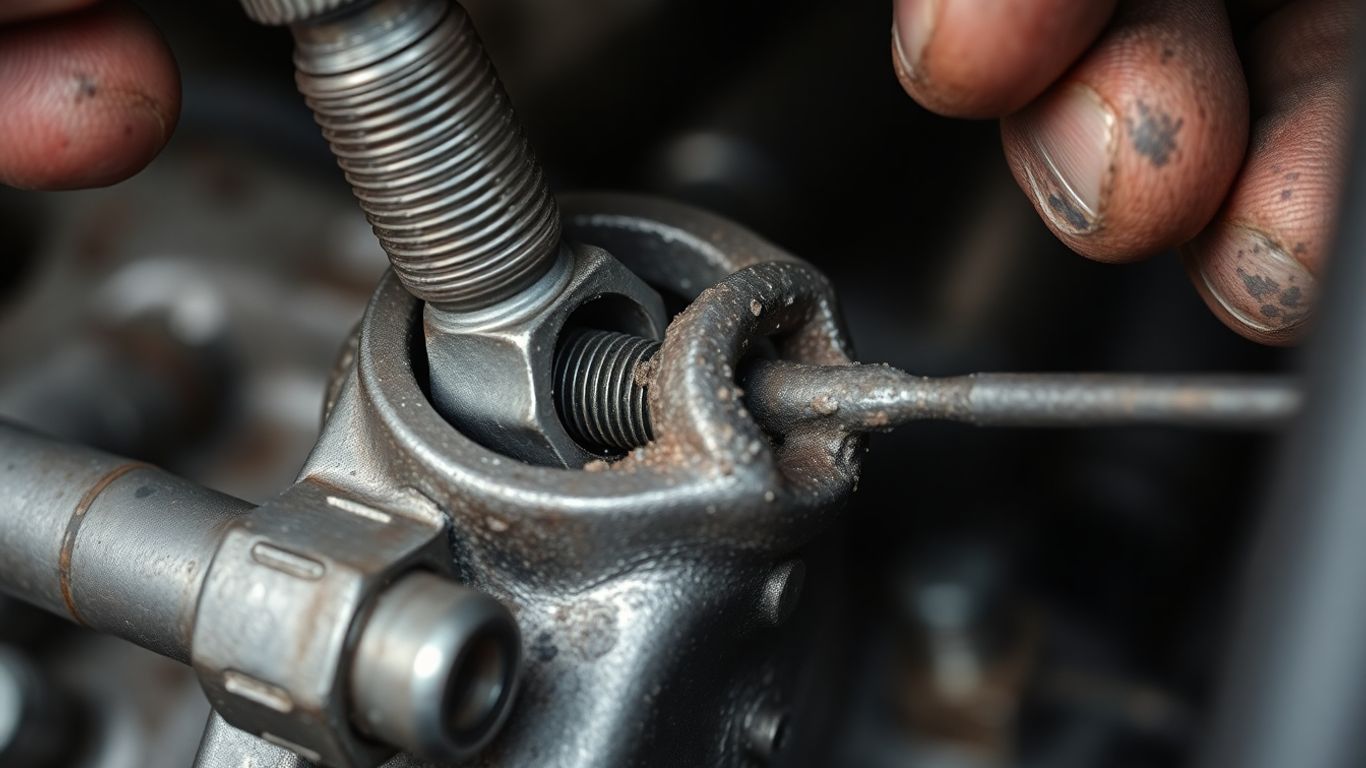
The Conical Conundrum: Why It's Complicated (But Necessary)
Many older vehicles, like the '41 Buick mentioned in some circles, use conical studs. These aren't just simple bolts; they have a tapered seat that wedges itself into the mating component, providing a secure, self-centering fit. This design is great for keeping things tight, but it also means you can't just slap any old bolt in there if the original stud gets worn or damaged. Replacing these can be a pain, and sometimes, the original stud is all you have to work with. The challenge then becomes how to make that conical stud work with modern components, like heim joints, without introducing that pesky wiggle.
Here's a quick look at the typical clearance issue:
| Component | Expected Clearance | Actual Clearance | Result |
|---|---|---|---|
| Stud OD | 0.5625" | ~0.560" | Wiggle/Clunk |
| Sleeve ID | 0.5625" | ~0.565" | Wiggle/Clunk |
This tiny bit of extra space is the enemy of a quiet, well-handling ride.
Mechanics' Best Friends: Tools of the Trade
Look, we all know that a mechanic without the right tools is like a chef without a whisk – pretty much useless and likely to make a huge mess. These aren't just random bits of metal; they're the extensions of a mechanic's brain and hands. Having the proper tools isn't just about making the job easier, it's about not turning a simple fix into a five-alarm fire. Think of your toolbox as your personal pit crew. You wouldn't send your race car out with bald tires, right? Same goes for your trusty wrench. Keeping them in good shape means they'll keep you in good shape, and more importantly, keep your customers happy (and their cars running).
More Than Just Metal: The Importance of Proper Tools
It’s easy to think, “Eh, a wrench is a wrench.” But that’s like saying a hammer is a hammer, whether it’s for tiny watch repair or building a house. The tools we use have specific jobs, and using the wrong one is a fast track to stripped bolts, busted knuckles, and that sinking feeling in your stomach when you realize you’ve made things worse. A good set of tools means you can actually do the job right, the first time. It saves time, saves money, and frankly, saves your sanity.
Keeping Your Tools Sharp (and Not Lost)
This is where things get serious. A dull screwdriver is a menace, a rusty wrench is an insult, and a missing socket? That’s a personal affront. We’re talking about precision here. A worn-out tool can slip, damage fasteners, and even cause injury. So, what’s the game plan?
- Clean Up: After every job, give your tools a quick wipe-down. Seriously, it takes like, ten seconds.
- Oil Up: For tools that might sit for a while, a little oil can prevent rust. Think of it as their spa treatment.
- Sharpen Up: Keep cutting edges and screwdriver tips in good shape. A sharp tool is a safe tool.
- Put 'Em Back: This is the big one. Know where each tool lives. When you’re done, it goes back in its spot. No excuses.
The biggest mistake a new mechanic can make is thinking they can get by with cheap, worn-out tools. It's a false economy. You'll spend more time fighting your tools than fixing the actual problem. Plus, you risk damaging the vehicle you're working on, which is a whole other can of worms.
The Humble Tool Box: A Mechanic's Sanctuary
Your toolbox isn't just a metal box; it's your command center. It's where your trusted companions live when they're not out saving the day. A well-organized toolbox is a thing of beauty. Everything has its place, so when you need that specific 10mm socket at 2 AM, you don't have to excavate half your life's possessions to find it. It's about efficiency, respect for your gear, and frankly, looking like you know what you're doing. A messy toolbox screams “I’m about to lose something important and probably break something expensive.” Keep it tidy, keep it organized, and your tools will thank you by working flawlessly when you need them most.
The Great Stud Kleen Debate: Hacks and High-Tech Solutions
So, you've got a stud that's looser than a politician's promise, and you're wondering what to do. Do you go for the quick fix, the fancy gadget, or just throw your hands up and call it a day? This is where the real fun begins, folks. We're talking about the wild world of trying to keep things snug when they've decided to go rogue. It's a battle of wits, and sometimes, a battle against your own sanity.
Loctite: The Mechanic's Super Glue?
Ah, Loctite. The blue bottle of hope. For those cylindrical fits that have seen better days, a good retaining compound can be a lifesaver. It's designed to fill those tiny gaps, giving your worn-out parts a new lease on life. Think of it as a high-tech hug for your metal bits. It's not exactly a permanent solution for everything, but for many situations, it's a solid choice. It's often the first thing folks reach for when a stud has a bit too much wiggle.
- Loctite 680: Good for gaps up to about 0.010 inches. It's a popular choice for cylindrical fits.
- Loctite 660: This one can handle slightly larger gaps, up to twice that of the 680. It's also known for its gap-filling properties.
Remember, these are designed for cylindrical fits. Using them on tapers that don't quite match can be hit or miss. Always clean your parts thoroughly before applying any adhesive.
Brazing and Soldering: Old School Fixes for New School Problems
Before the days of fancy adhesives, mechanics had to get creative. Brazing and soldering are like the vintage clothing of repair methods – they've been around forever and can still look good if done right. Brazing involves melting a filler metal to join two pieces, while soldering uses a lower melting point. Both can add material to fill those annoying gaps. The trick is having the skill and the right setup to do it without warping everything into a pretzel. It's definitely a more involved process than just squirting some goo on it, and you've got to be careful not to mess up the temper of the metal.
Shim Stock and Feeler Gauges: The Art of the Janky Fix
Sometimes, the simplest solutions are the most overlooked. If you've got a little bit of slop, a few wraps of shim stock or even a carefully cut piece of feeler gauge can work wonders. It's like putting a tiny, precise bandage on your metal problem. This is the kind of fix that makes you feel like a MacGyver of the automotive world. It might not be pretty, but if it stops the clunking and holds together, who cares? It's a great way to get a little more life out of parts that are just on the edge of being too worn out. For those situations where you need to take up just a few thousandths of an inch, this is your go-to. You can find good shim stock at places that sell automotive repair tools.
- Shim Stock: Thin metal sheets that can be layered to fill gaps.
- Feeler Gauges: Precision metal strips used to measure clearances, but can also be cut and used as shims.
- The Goal: To create a snug fit without excessive force.
These methods are often considered temporary or for light-duty applications, but they can certainly get you out of a bind when you need it most.
When Heim Joints Go Rogue
Sometimes, even the most robust parts decide to take a vacation from their intended purpose. That's when Heim joints, those trusty spherical bearings, can start acting like they've had one too many at the local dive bar. We're talking about that annoying wiggle, that subtle (or not-so-subtle) clunk that makes you question your life choices and the integrity of your suspension. It’s a situation where the connection between two parts is supposed to be solid, but instead, it’s got more play than a politician’s promise.
The $50 Joint vs. The $8 Joint: A Pricey Predicament
Ever been faced with a repair where the
Creative Solutions for Stubborn Studs
So, you've got a stud that's looser than a politician's promise, and it's making your ride sound like a bag of wrenches in a tumble dryer. Replacing the whole shebang might be the 'right' way, but let's be honest, sometimes that's just too much cash for a problem that's more annoying than catastrophic. We've all been there, staring at a slightly wobbly connection and thinking, 'There's gotta be a hack for this.'
Rubber Bushings: The Unsung Heroes of Shock Absorption
Sometimes, the simplest things work best. Think of rubber bushings as the shock absorbers for your shock absorbers. They're not fancy, but they can take up that annoying little bit of play that makes your car sound like it's falling apart. You can try to find a rubber piece that fits snugly around the stud, then install your heim joint over it. It's like giving your stud a little rubber hug to keep things quiet. It might not be a permanent fix for a high-stress situation, but for those everyday rattles, it's surprisingly effective.
Drill, Tap, and Pray: A DIY Approach to Stud Security
This one's for the brave, or maybe just the desperate. If you've got a stud that's just begging for a little extra attention, you can always drill and tap it. The idea is to drill a hole right in the center of the stud and then tap threads into it. Once that's done, you can use a bolt and a washer to keep everything locked down. It's a bit more involved, and you'll want to make sure you've got the right size drill bit and tap. Precision is key here, or you'll just make a bigger mess. It’s a bit like trying to remove a cotter pin – requires the right tool and a bit of finesse.
The Loctite 680 Gambit: A Future Fix?
For those who like their fixes a little more… chemical, there's Loctite. Specifically, Loctite 680 is designed for retaining cylindrical parts and can fill small gaps. It's not exactly a permanent weld, but it can definitely take up that slight wiggle. You clean the surfaces, apply the Loctite, and put it all together. It's a cleaner approach than some of the other methods, and it's reversible if you ever need to take it apart again. It's a good starting point when you're not sure what else will work.
When dealing with loose studs, remember that the goal is often to eliminate noise and prevent further wear. While a permanent, precision-engineered solution is ideal, sometimes a well-executed temporary fix can save the day and your sanity. Always assess the forces involved and choose a method that can withstand them, even if it's a bit unconventional.
Machinists to the Rescue: Precision and Patience
Sometimes, you've tried everything. You've wiggled, you've jiggled, you've probably sworn a bit too. The studs are just not cooperating, and your usual bag of tricks is looking pretty empty. This is where the wizards of metal, the machinists, come in. They're the folks with the fancy machines and the steady hands who can take a problem that seems impossible and make it… well, less impossible.
The Lathe's Lament: When Custom Adapters Are Needed
Ever had a situation where the hole is just a hair too big, or the bolt is a smidge too small? It’s like trying to fit a square peg into a round hole, but with more metal shavings. A machinist can whip up a custom adapter on their lathe. Think of it as a perfectly tailored spacer or sleeve. They can bore out a piece of stock to the exact size you need, then turn it down to fit snugly into your existing hole, or create a new piece that bridges the gap between your wonky stud and its reluctant home. It’s not exactly a quick fix, but when it’s done right, it’s rock solid.
Shouldered Studs: The Cadillac of Stud Solutions
If you're dealing with a stud that keeps backing out or just won't sit right, a shouldered stud might be your knight in shining armor. These aren't your average bolts. They have a specific shoulder that acts as a positive stop, preventing over-tightening and ensuring the stud sits exactly where it's supposed to. A machinist can create these beauties from scratch, often with threads on both ends and that all-important shoulder machined to perfection. It’s a bit more involved than just screwing in a bolt, but the reliability is top-notch.
Bartering for Brilliance: The Cost of Custom Machining
Let's be real, this kind of precision work isn't free. Machinists have bills to pay, and their machines cost a fortune. So, what can you expect to shell out?
| Service | Estimated Cost Range |
|---|---|
| Custom Adapter (Simple) | $50 - $150 |
| Shouldered Stud | $75 - $250+ |
| Complex Machining | $150 - $500+ |
These are just ballpark figures, of course. The complexity of the part, the type of material, and how much time the machinist has to spend on it all play a role. Sometimes, you might even find a machinist willing to trade services – maybe you're good at something they need done. It's worth asking!
When you're dealing with a problem that standard parts just can't fix, a machinist is your best bet. They have the tools and the know-how to create exactly what you need, ensuring a perfect fit and a lasting solution. It might cost a bit more upfront, but the peace of mind and the reliability are usually well worth the investment.
So, next time you're staring down a stubborn stud and feeling defeated, remember there's a whole world of precision metalworking out there, ready to save the day. It just takes a little patience and knowing who to call.
Machinists are like wizards with metal, using their sharp minds and steady hands to create amazing things. They need a special kind of patience and skill to get everything just right, making sure every part fits perfectly. If you appreciate this kind of detailed work, you'll love what we offer. Visit our website to see how we bring that same precision to your vehicle's needs!
So, What's the Takeaway?
Look, we've all been there. You're trying to fix something, maybe a clunky suspension part on your beloved ride, and you end up with more grease on your face than on the actual problem. It’s a tale as old as time, or at least as old as the first time someone tried to tighten a bolt with a butter knife. While we didn't quite get to the bottom of whether 'Stud Kleen' is the magical elixir for every automotive woe, we learned that sometimes the simplest fix, like a bit of Loctite or a well-placed rubber bushing, can save you from a world of headaches. And hey, if all else fails, there's always duct tape. Just kidding... mostly. Now go forth and conquer those car troubles, or at least make them slightly less noisy!
Frequently Asked Questions
What's the main problem with these studs?
The studs have a bit of wiggle room, like a tiny bit of space between the stud and the part it connects to. This wiggle can cause a clunking sound when things move, and we need to get rid of that noise.
Are new studs always the best fix?
New studs can be great, but they might cost too much for some projects. Sometimes, fixing the old studs is a better option, especially if the new ones are expensive.
What is Loctite and how is it used?
Loctite is like a super glue for metal parts. There are different kinds, like Loctite 680 or Loctite 'Quick-Metal' 660, which are used to fill small gaps and hold parts tightly together, stopping them from moving or rattling.
Can old-school methods like soldering work?
Some people think about using old methods like soldering to fill the gaps. While it might fill the space, it's not always strong enough for parts that handle a lot of force, like those in a car's suspension.
What are Heim joints and why are they mentioned?
Heim joints are special connectors used in some car parts. The problem can be that the parts they connect to aren't always the perfect size, leading to that annoying wiggle and clunk.
Are there ways to fix the wiggle without fancy parts?
Yes! Sometimes, using rubber pieces, like bushings, can help take up the extra space and stop the clunking. Other times, mechanics use thin metal pieces called shim stock to fill the tiny gaps.


